I wanted to make a cute soap that would stay put next to the sink, so join me on the adventure where I discovered a couple interesting hacks:
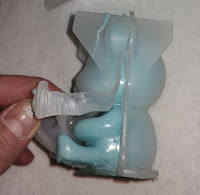
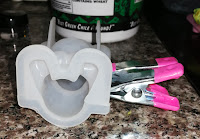
I found this teddy bear silicone mold on ebay, but I was having a super hard time getting the soap out without damaging it. So I carefully sliced open one side of the mold.... Then I used these clips from Dollar Tree to hold that edge tightly shut (I saw online other crafters used electrical tape or rubber bands) while I poured the soap in and let it harden. I use melt & pour soap base because it's easy 🙂
I tied a rubber band on top of the suction cup so the soap has more surface area to hold on to. Let the soap harden slightly (5 seconds lol) and then push the suction cup piece down in place. It's ok if it sinks in a little.
When the soap hardens take it out of the mold carefully. The suction cup needs space around the base in order to function properly, so if you need to: use a knife to carefully shave off soap and give the suction cup space!


It’s essential to note that retraction settings are relative to print size and shape complexity – you will want to adjust accordingly. The retraction settings are most likely too low if you have strings, blobs, or zits. Try increasing the retraction speed and decreasing the retraction distance and see if it helps. Alternatively, can even make|you may make} helps easier to take away by decreasing the move rate, which, if accomplished right, won’t over-compromise the bond between layers (a move rate that is too low could cause points with inter-layer adhesion). To make issues easier, {you can also|you may CNC machining also|you can even} retrofit a mattress levelling sensor in case your 3D printer hasn’t got one –check out these sensorsfor concepts.
ReplyDelete